
I first encountered the mysterious codes 400, 410, and 415 and wondered what secrets they held for packaging. I quickly learned they’re more than just numbers.
These numbers tell a story: 400 is continuous thread, 410 is modified continuous, and 415 is vented. Each one is like a unique shoelace style for bottles, ensuring the right fit for every product need.
Let’s explore how these caps really change the packaging game.
What Do These Numbers Actually Mean?
At first, these codes confused me—they seemed cryptic. But soon I learned they explain a cap’s design and purpose.
400 means a full continuous thread, 410 is a slight tweak for added function, and 415 offers vents for air circulation—just like choosing the perfect shoelace style for your favorite sneakers.
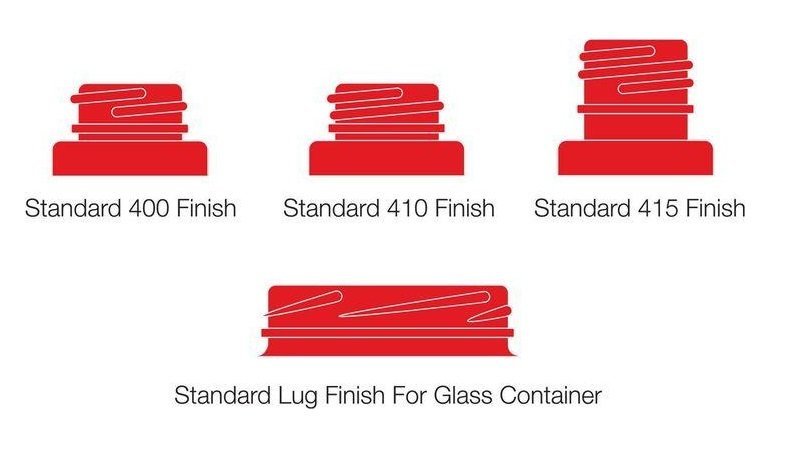
When I first encountered 400, 410, and 415 caps, I felt overwhelmed by their technical names. However, as I delved into them, I realized each number carries a distinct role in packaging. The 400 cap, with its continuous thread, is engineered for a seamless seal, ensuring that liquids stay put even during rough transport. I learned that this design is perfect for products that demand a secure, leak-proof closure.
In contrast, the 410 cap offers a modified continuous thread. This means it’s very similar to the 400, but with a few tweaks that enhance its usability. For example, it often provides a better grip or improved compatibility with automated machinery. I recall a client comparing it to upgrading from a regular shoelace to one with a special tip—small changes that make a big difference.
Then there’s the 415 cap, which is vented. The vent allows for controlled airflow, which is crucial for products like certain chemicals or delicate formulations that require a bit of breathing room. Imagine a sports shoe with ventilation holes—this cap gives the product a chance to “breathe” and maintain its quality under varying conditions.
To clarify these differences, here’s a simple table:
| Cap Type | Thread Type | Ideal For | Key Feature |
|---|---|---|---|
| 400 | Continuous Thread | Products needing full seal | Uniform grip |
| 410 | Modified Continuous Thread | Child safety products | Enhanced functionality |
| 415 | Vented | Chemicals, sensitive goods | Airflow management |
This table helped me visualize the differences clearly. Over time, I began to appreciate how such details affect not only product performance but also customer satisfaction. Each cap type is designed with a specific purpose, ensuring that every product is protected in the best possible way. It was like unlocking a secret code that made me a more confident and knowledgeable packaging professional.
I now see these numbers as a language of their own—one that tells the story of quality, safety, and precision in packaging. Every time I choose a cap, I’m reminded of how a small design tweak can make a world of difference.
How Do These Caps Affect Product Safety?
Every day in my line of work, safety is my top priority. I’ve seen firsthand how the right cap can prevent disasters and ensure products reach customers intact.
A 400 cap may leak in transit, a 410 cap can block unwanted access to medications, and a 415 cap provides the perfect airflow for sensitive chemicals, putting safety first.
I remember a hectic day when a shipment using 400 caps started leaking during transport. It was a wake-up call that even a small misstep in cap selection can lead to major issues. I then began to see that each cap type has its own safety profile. For example, the 410 cap’s design isn’t just for aesthetics—it has proven effective in preventing accidental spills, especially in products like child-resistant medications. The innovation behind these caps was born out of a simple idea: protect the product and, ultimately, the consumer.
During one project, I observed that a batch of chemicals packaged with 415 caps maintained their integrity much better than others. The vented design allowed for just the right amount of airflow, preventing dangerous pressure build-ups without compromising the seal. This reinforced my belief in a “safety first” approach when it comes to packaging.
I’ve also learned that safety isn’t only about preventing leaks. It’s about choosing a cap that fits the product’s entire journey—from production and storage to shipping and final delivery. For example, during quality control meetings, my team and I compare different cap types under various stress tests. We assess their resistance to vibration, temperature changes, and even accidental drops. These tests have shown that even a minor design difference can be the deciding factor between a safe product and a potential hazard.
To summarize my experience, here are a few critical safety factors I consider:
- Leak Prevention: Ensuring the cap seals completely.
- Child Resistance: Using designs like the 410 cap for products that need extra security.
- Ventilation Needs: Choosing a vented 415 cap when product chemistry demands airflow.
I often discuss these points with suppliers, emphasizing the need for precision in every batch produced. Through trial and error and careful analysis, I’ve built a robust understanding of how each cap type contributes to overall safety. The lessons learned over the years remind me that in packaging, every detail matters—even the numbers on a cap can save the day.
Why Can't I Just Use Any Cap?
I once made the mistake of using the wrong cap, and it cost me dearly. That experience taught me that there’s no “one size fits all” in packaging.
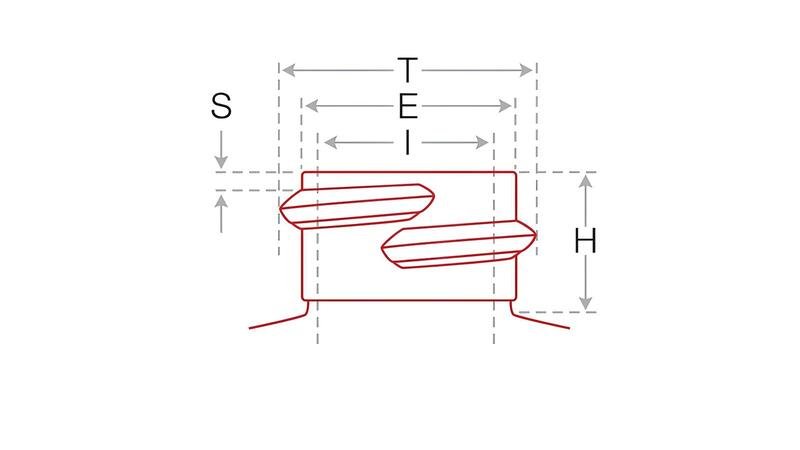
Every product is unique. I always check container neck finish, product viscosity, and storage conditions—because using the wrong cap can spoil an entire batch.

Not long ago, I trusted a cap that seemed universally applicable, only to find out later that it led to product spoilage. The lesson was clear: I cannot simply grab any cap off the shelf. Each product demands careful evaluation. I now take the time to study the container’s neck finish, ensuring that the cap can secure tightly without damaging the container. It’s like choosing shoes that perfectly match the shape of your feet—if they don’t fit well, you’re bound to have trouble.
Next, product viscosity plays a huge role. For thicker products, a cap must be designed to handle the extra weight and stickiness without compromising the seal. I recall a time when a viscous product leaked because the cap wasn’t designed to handle its density. It reminded me that even a tiny oversight could lead to significant losses.
Storage conditions also cannot be overlooked. A cap that works well in a cool, dry environment might fail in a humid or hot climate. I remember a cold winter turned sour because the cap material became brittle, leading to cracks and leaks. This taught me to always consider the environment in which the product will be stored and transported.
Here’s a quick breakdown of the factors I always verify:
| Key Factor | What I Check | Why It Matters |
|---|---|---|
| Container Neck Finish | Compatibility with cap design | Ensures a secure, leak-proof seal |
| Product Viscosity | Thickness and flow characteristics | Prevents spills and maintains product integrity |
| Storage Conditions | Temperature and humidity levels | Protects against material degradation |
My approach is simple: no cap fits all. I learned that making an assumption can be a costly mistake. Each cap type was developed with a particular product in mind, and understanding this has saved me from many potential mishaps. It’s a process of trial, error, and continuous learning—a journey that has enriched my expertise in the packaging industry.
Today, I stand by the principle that informed choices lead to safe products. My mistakes have become stepping stones, guiding me to always question and verify every detail. That extra moment spent analyzing the cap can prevent major setbacks down the line. This vigilance has not only improved my work but also built trust with my clients, who now know that I leave nothing to chance when it comes to their packaging needs.
How to Choose the Right Cap Without Overcomplicating?
I developed a simple 4-step process for choosing the right cap, which saves time and avoids confusion. It’s all about matching the cap to the product’s needs.
I always match cap numbers to container specs, consider tamper evidence, check chemical compatibility, and test samples. When in doubt, I ask my supplier three key questions.

Over the years, I’ve honed a straightforward selection process that helps me choose the right cap without unnecessary stress. The first step is to match the cap numbers to the container specifications. I review the container’s neck dimensions and the product’s characteristics to determine whether a 400, 410, or 415 cap is most suitable. This step is critical because even a slight mismatch can lead to poor performance.
The second step involves considering the need for tamper evidence. Some products require extra security features to prevent unauthorized access. In these cases, a modified cap like the 410 might be the best option. I always ask myself: “Does this cap add that extra layer of security?” My answer guides the decision.
Next, I examine chemical compatibility. Products with reactive ingredients need caps that can withstand their chemical properties. For instance, if a product is acidic or contains volatile compounds, the cap must be made of a material that won’t degrade over time. I often run small tests or consult with suppliers to verify this compatibility, ensuring that the cap won’t compromise the product’s quality.
The final step is to test sample caps. No matter how confident I feel about a selection, I always conduct a trial run. I install sample caps on a few containers and monitor them under conditions that mimic real-life storage and transportation. This testing phase is like taking a test drive before buying a car—it confirms whether my choice truly meets the product’s needs.
To sum up my process, here’s a quick reference table:
| Step | Action | Key Question to Ask |
|---|---|---|
| 1. Match Specifications | Compare cap number with container specs | “Does it fit perfectly?” |
| 2. Consider Tamper Evidence | Evaluate security features | “Is additional safety needed?” |
| 3. Check Chemical Compatibility | Ensure material resists product reactions | “Can it handle the product’s chemistry?” |
| 4. Test Samples | Run real-life simulations | “Does it perform under stress?” |
This method has saved me time, money, and heartache. I remember a time when I bypassed testing, only to face a major setback when the chosen cap failed unexpectedly. That experience underscored the value of my four-step approach.
Whenever I share these tips with fellow packaging professionals, I emphasize that the right cap is not a one-size-fits-all solution. It’s about understanding the product and trusting a process that has been refined over years of experience. Simple, systematic, and backed by real-world trials, my approach helps me choose a cap that not only meets the technical requirements but also upholds the integrity of the product throughout its lifecycle.
I’ve learned that clear communication with suppliers is key. I often conclude my process with a few pointed questions, ensuring that every detail is confirmed before moving forward. This not only simplifies the process but also builds a reliable relationship with my suppliers. In the end, a well-chosen cap is more than just a component—it’s a promise of quality and care.
Conclusion
Choosing the right cap is personal and precise. With clear steps and careful testing, I ensure every product is safe and true to its design.


